Mt. Rainier and Lenticular Clouds - Dec. 2008 copyright: JMM
Showing posts with label candle crafts. Show all posts

June 3, 2015

Glass & Candles

One of my fellow crafty pals picked up a load of free glassware at our local dump's swap shop for me recently, so I decided to try and do some glass painting with the pieces.  I made a ginormous mess in the kitchen that lasted for days, to the point where I was reduced to eating cheese & crackers for dinner because I couldn't fix a decent meal.  

The glass painting was extremely slow going and to be honest I'm not terribly excited about the final results.  Not my best work at all.  I encountered some issues with the alcohol ink that bummed me out.  They dried cloudy for some reason which was distressing.  I cleaned the glass with rubbing alcohol like you are supposed to but it didn't come out right.  


While I was waiting for stuff to dry, I made these beachy candles.  I'd gone down to the beach near my house that morning to get sand and stones.  The shells are mostly from Florida, brought back for me by friends.  The glass is, of course, purchased. 

For the large one, I glued a tall candle already in glass in the center before I filled the sides.  Then added the rope to the top. 


I have a craft show coming up on June 13 here in Buzzards Bay, so I wanted to burn one of the treasure candles to make sure that the wax didn't leak out of the bottom like it did when they were poured.  I wasn't going to sell these if they leaked and this one didn't.  

It took about 2 hours to uncover the glass.  If you fish it out quickly enough and wipe it off, the liquid wax comes right off.  Same with the shells.


I also made these for my craft fair.  Mini bottles with beach glass chips on chains.

Another good friend of mine posted a link to a tutorial on how to turn old bottles into picture frames. HERE is the link.  She also provided me with a bunch of empty wine bottles for me to use too!  I decided to use a wedding picture since I had a spare copy of it on hand.  First I poured in a bunch of sand, then rolled up the pic and dropped it down.  This is where I kind of ran into a problem.  The pic did stay against the glass because I kept the bottle angled when the pic was put in.  But it's also below the curved part so there's nothing you can use to push it into the sand.  All I could do was pour more sand in, then start dropping rocks, shells and glass behind the picture to keep it upright.  I found the purple thing (which is on elastic stretch cord) on clearance at Michael's, added the top bead to the cork and I had a string of strung glass pearls in a bead box.  

Back showing the glass and stuff.

I'm not sure how much else I will be able to do before the show next week.  Life has become extremely busy, stressful and complicated in our little world with a lot of family issues so there hasn't been a lot of time to devote to preparation, or time to devote to taking walks, beachcombing or day trips for that matter.  This year is going by just way, way too fast.

January 19, 2015

Candles, Custom Work & Colouring

I suck at candle making, I really do.  I tried it out west....I was so enthusiastic and bought tons of stuff.  I figured how hard can it be?  Well as it turns out, for me, it's hard.  I got rid of all my supplies long before I moved.  Last year, my friend Tracy told me she had a bunch of empty decorative tins she was going to toss out unless I wanted them.  Being the King Moonracer of Misfit Craft Supplies, I told her I'd give them a good home.  

Wasn't really sure what to do with all those tins, but I figured how hard could it be to pour wax inside and make candles?  It's basic enough....doesn't require a lot of technique or understanding.  Got some wicks, wax pellets, a candle thermometer and a melter/pourer.

My first attempt was a little rocky.  I cooled the tins in a pan of cold water with some ice cubes.  It was at this point I discovered that the tins aren't watertight.  Water seeped up the edges and caused the wax to separate.  I had to pour the water out of sides after they were completely cool.


So the next attempt was by keeping the tins in the pan on wax paper.  This time I only poured them about half way full, then I took them outside to set up in the icy cold air (it was about 20).  That worked a bit better except the wax leaked out the bottom around the edges but it scraped off pretty easily.

This time I decided to put some shells and beach glass on top of the first hardened wax.  I was afraid that the top layer would melt the bottom, causing the treasures to be forced to the bottom.  So instead of bringing the cooling tins inside, I brought the melted wax outside and that worked well to keep the first layer from liquifying.

It was snowing by the time I finally brought them in.  This is what the treasure ones look like with their lids.

And without the lids.  I think they came out pretty good!

Then I robbed some tea lights of their wicks and glued them onto some shells, then poured wax in them.  The two smallest shells have been painted with metallic paint and I don't know how safe it will be to have hot wax or an open flame near it.  Time will tell.  

Then I decided what the heck....why not just use up all the wax since I have the tins since the weather is cold?  So I spent over four hours one afternoon melting, pouring and setting about 12 or 13 more tins' worth of treasure candles.  They set up so much faster when it's 25 degrees out. 

A wolf charm surfaced when I was reorganizing all my beads so I made this necklace for my bff Shelly.  She picked the length and the colours.


The Creatures of the Salish Sea colouring book had also just arrived and the pictures were large enough to be quick workups and there were only about 8 pages in it anyway (since the book was designed to be easily completed in the Victoria Clipper's nearly 3 hour journey between Seattle and Victoria), so I did it up one afternoon.  Mine took a little longer than 3 hours because I had to google exactly what each animal looked like and attempt to replicate it with the crayons I had on hand.

Pardon the flash reflection at the bottom....I was in a hurry to shoot and upload these pics.

I rarely work with crayons these days so it was nice to use them again, although I notice they are definitely not the quality we had in the 70s.  I really don't remember the wax flaking and stickiness of them at all.


I have another colouring book of Washington State history and symbols, which is also geared for kids and is another one that I finished in just a few days.  I am using crayons and Crayola brand coloured pencils (usually I use the higher quality Prismacolour) on this one.

I think what strikes me most about this particular picture is the grin on the girl's face.  All I can think about is, 'Girly, you are in for the hardest few months, possibly years, of your young life.  You're gonna have that smile wiped right off your face in the first few weeks of this journey,'  I realize the illustrators had to make the book upbeat for kids, but seeing this girl look like she's having the time of her life on the Oregon Trail is a little disingenuous when you know the history of the hardships faced by the pioneers on their trips west.  

July 24, 2014

Organized Chaos

So this happened one day when I was trying to clean up or at least reorganize my craft table.  I found a baggie of crystals I ordered to make a project I'm dying to do, but haven't because I have nowhere to put it when it's done. I dug out some driftwood to see how they'd look as a driftwood hanging instead.  I didn't end up assembling it with the driftwood.  

So pretty!

Then I unearthed a few small things I'd been meaning to do so I glued these glass tiles onto a votive candle holder.  I keep forgetting how time consuming these projects are due to drying time and making sure the tiles don't slide out of place or fall off.

I had a bunch of small red skull cabs so I put them on 4 sides of the glass and filled in with red and purple glass blobs.  

These lightbulbs also surfaced on the table so I broke out the glass paint.  The Pinterest project originally showed nail polish on the bulbs but I didn't like the way it looked. I had to pilfer the tops of Christmas ornaments to glue on top of the lightbulb, then added the beaded hanger.  


I made this a few days before the attempt to clean the table off.  10 points to Ravenclaw!  Just a hangie thing I stuck on the wall in the bedroom.  I found the fillable bottles at the craft store and got the copper coloured ones.  Filled it with blue beads and then added the copper wings (for the Ravenclaw eagle) and then the hanger in the House colours as well.  Yes I'm obsessed with Harry Potter.  OBSESSED.  I don't even want to admit how much time I spent on the Pottermore website this month and watching the movies on ABC Family, as well as rereading the last 2 books.

My honey and I were at this great old store called Benny's, which is a real throw back to another era. It's been around forever.  He bought me this black velvet colouring poster which I can't wait to do.

The table may look as bad as it did before it was reorganized, but I truly can tell the difference.  At least now it's organized chaos.  And now I'm ready to start my new poster!

July 23, 2012

Being Silly, Paintballs & A Blast from the Past

I've been seeing these cute finger doodles on Pinterest so I did one on my own fingers.  It's supposed to be me and Russell with our arms around each other.  (In reality he's a lot taller than me). 


I was looking for something in my many still-packed craft boxes and came across this tackle box. There was a time when all my craft supplies fit into it.  Beads, needles, thread, pencils, erasers....this would have been late 1988/early 1989, before I moved to San Francisco.  There's not much in it now, but I hang onto it for posterity.

I laughed when I found this little punky guy inside the tackle box.  I made it out of Fimo clay over at Holly's rental cottage in Pocasset, back in the spring of 1989.  It sure took me back to another time in my life, that's for sure!  Back when my world began to completely revolve around the Grateful Dead and moving west.  I was soooo young...just 24.

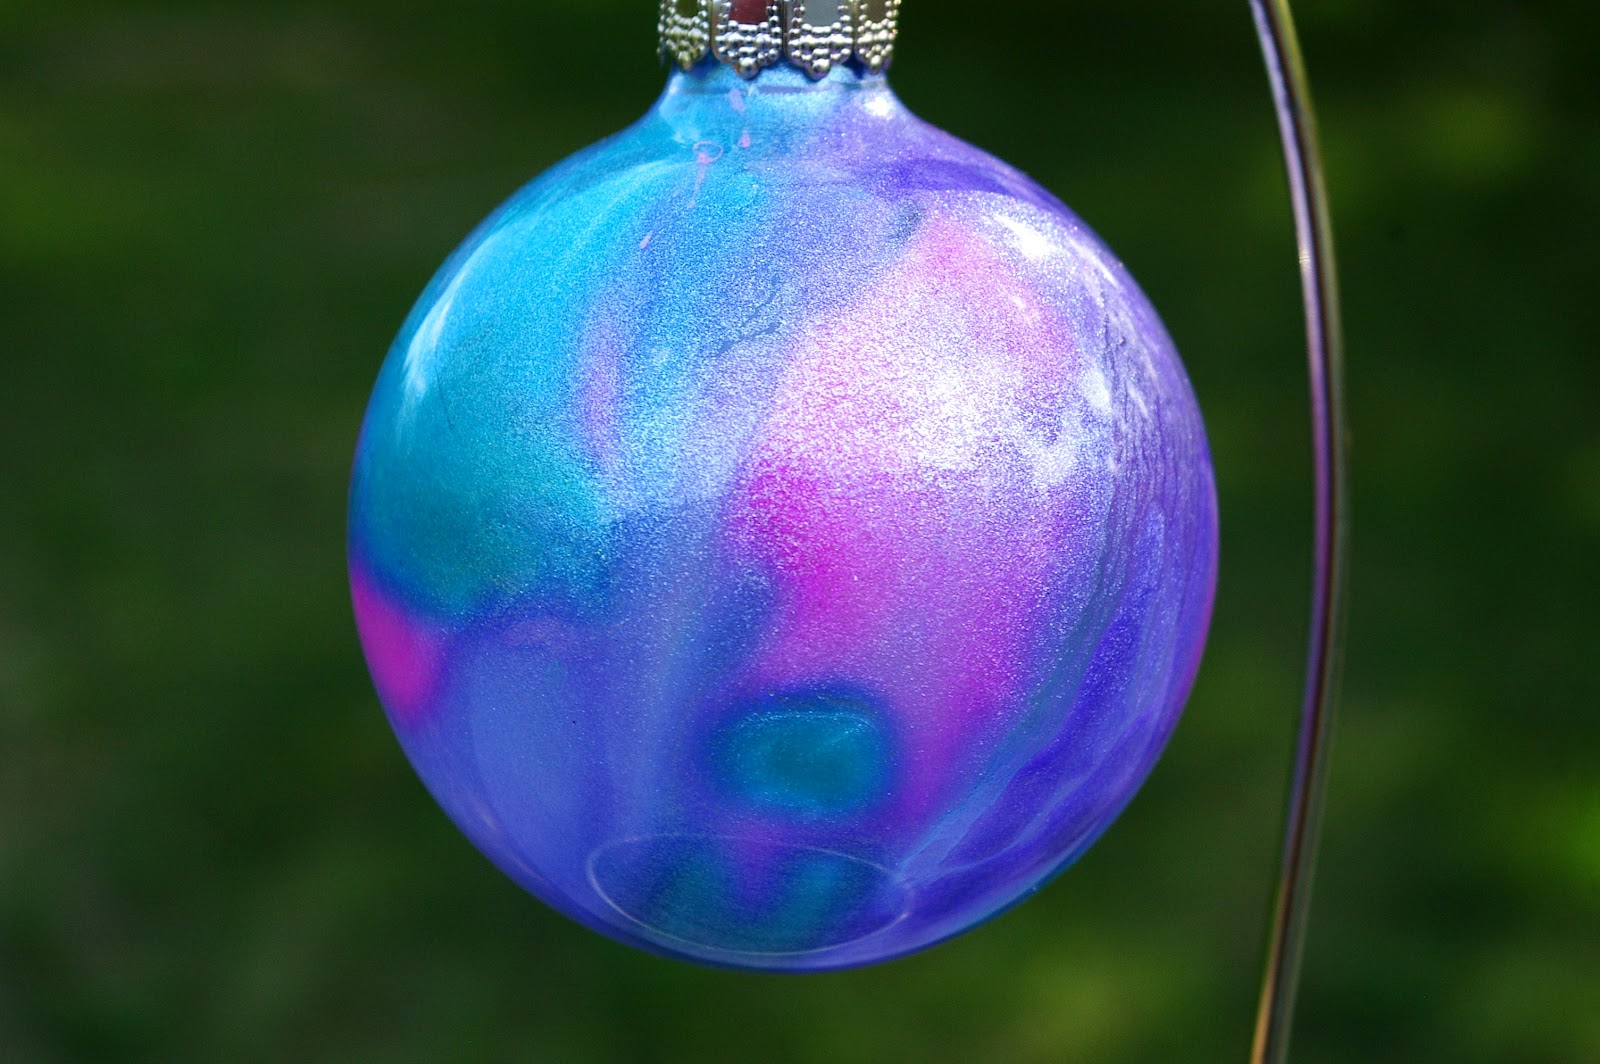
I ended up breaking out the paints again this particular day, even though I finally got them neatly put away, because of another craft project I wanted to try, which was dripping paints inside of clear glass ball ornaments, which I just happened to have.

I decided to start with the metallic paints first, but they were really gloppy and I knew I'd never get them to drip and mix in their current state.

I chose to use pink, purple and aqua, and mixed them with enough water to make them drippy.
Using a paintbrush, I dripped the paints inside, then shook the ball rapidly to spread it around.  It took awhile to apply and spread the paint all around the ball.

Since all the colours started to pool and mix together at the bottom, I made sure to keep tipping the ball upside down, and in fact, that's the way I chose to dry it.  First I let it sit upside down to drain on top of paper towels, then I brought it outside to let the sun and wind dry it out.

Some of the paint separated as it dried, but it's still a cool effect.


I'd found my crafting beach glass (bought in Michaels, not found on the beach) and pebbles, and I made a beach-theme ornament too, also using sand and some of the shells Barit brought me back from Sanibel Island.


It also happened to be Pride Weekend, so I dripped rainbow paints inside another ball and shook it around.  These paints proved more problematic because too much mixing can yield an ugly grey/brown colour.

It was drained the same way, upside down on paper towels, then placed outside to dry.

Sadly, while these balls came out really cool the first day, I notice that, over time, the paint is either chipping or pulling away from the surface on the inside, leaving small holes.  I will have to figure out a better way to do this.

It's amazing how many craft supplies I've unearthed....all the stuff I bought, in the off chance that someday I'd have the time to use them.  I forgot all about the sack of large and small smooth rocks and pebbles, purchased lord knows how long ago.  This small bowl was also awaiting use so I made a little candle holder out of all of it.


Finally, my mom unearthed this from her cedar chest.  I had no idea she'd saved it!  This is my very first embroidery project, made when I was still very little.  It was very hard and I hated doing it.  I was forced to finish it and I did so, under protest.  Age '7' was added before it was completed, hence the off-center and badly stitched '8'.  This really was too ambitious a project for a 7 year old and my mom even commented  that, upon seeing it now, she doesn't know why she chose such a complex design for me to do.