

Mt. Rainier and Lenticular Clouds - Dec. 2008 copyright: JMM
January 25, 2012

January 23, 2012
Tie Dyed Cupcakes, Part 2
Now that the cupcakes are baked and cooled, it's time to do the icing. I got the step-by-step instructions HERE, and it was a lot easier than I expected it would be. You will use gel or paste food colouring for the icing, rather than the liquid dye used for the cupcakes. However, they are MUCH harder to mix to obtain a good orange, and purple was out of the question. I could not find a good mix of red and blue that worked at all, even when I used the tiniest dot of blue with the red (applied on the point of a toothpick, no less). The blue was just way too overpowering, so I didn't use purple and didn't really miss it.

I found a decorating kit with tips and disposable bags. Disposable icing bags are a must for this project. I ended up using 4 of them.

I got 2 cans, 'just in case', but only ended up using one.

Use a glass to hold the empty icing bag upright.

Using a stiff-bristle paintbrush, paint the gel dyes into stripes on the inside walls of the icing bag. Then scoop the icing into the bag and squeeze it from the top down to the tip. Don't push the icing down with the spoon because that might mess up the colour stripes. Squeeze out the first bit of icing into a bowl till the colours start coming out.

That's what the icing looks like with the colour streaks.

My "palette". The smudges on the left was the attempt at purple.

VOILA!!!! The first two uses of the icing is the most vibrant. Then it starts to get a little more pastel as you go. I used 4 disposable icing bags for 1 batch of 12 muffins, to keep the colours as rich as possible.

I know my icing technique isn't terribly good, but I'm pretty pleased with the final results!!! I was so excited that I was dancing around the kitchen, squealing and saying, 'COME LOOK! COME LOOK!" to the squeeze. He took one look at the plate and said, "Boy those sure have 'hippie' written aaaallll over them...."

He said these looked like "Heat Miser Hair", which is funny because I thought the same thing. lol


I used one bag with just green and blue dye for a couple of them. Not sure what I was going for with that green and blue design...sorta looks like a sea anemone.


And sampling the final result!!! Nom nom nom nom

I can't emphasize enough how much fun this baking project was. Easier than I thought, but definitely time consuming. So worth the end results though!
January 21, 2012
Tie Dyed Cupcakes, Part 1
The other day on Facebook, Kris, of JustKris fame, posted a photo of professionally made cupcakes with beautiful tie dyed frosting. My eyes lit up like a Christmas tree. That's when I decided I HAD to find out how to make them. A simple Google search of 'tie dyed cupcakes' yielded easy instructions, so I went out the next day to purchase everything I'd need to make them.
Start off with any white or yellow cake mix. I used white cake. Make the batter according to the directions on the box.

Line the muffin tin with paper cups

Divide the batter evenly into 6 bowls (one for each colour).

Use liquid food colouring for the batter dying.

Mix the colours per your taste; I used 30 drops of dye per bowl to start out for the red, yellow, green & blue, then added more as needed. For the orange and purple, I started somewhat conservatively with the dyes and then kept adding to achieve the desired shade.

I started by layering with the purple at the bottom, and building up in the colours of the rainbow with red on top. I knew I overfilled the first cup.


After doing 2 with rainbow layers, I started getting a little more creative with them. This cupcake is only red, orange and yellow.

Then I used a toothpick to swirl it a little. Don't mix too much or else the colours will run into each other.

Here's a swirly one that's only using blue, green and purple.

With my last bits of batter, I made one that had all 6 colours done in 3 layers. This is the bottom layer.

And the top.

Ready to go in the oven!!

Cooking away.

A little overflow never hurt anyone. ;-D

Side view to show the layering effect.


The squeeze isn't much into sweets, especially not icing, so he asked me to save a couple un-iced ones for him. I was tickled to see that the tie dye effect carried through to the paper!

Waiting patiently for icing.

January 19, 2012
January Days
While I feel sorry for the plow drivers and ski resorts, I am loving this January weather. We continue to have day after day of clear, crystal blue skies, with the occasional grey or rainy day. We had a few bitter cold days again over Martin Luther King Jr. Day weekend, where it got up to a balmy 17* one day. Still, as long as you were bundled up, it wasn't that bad. This came across my newsfeed on Facebook and it really made me laugh. This was so totally me on those freezing cold nights and mornings!!!

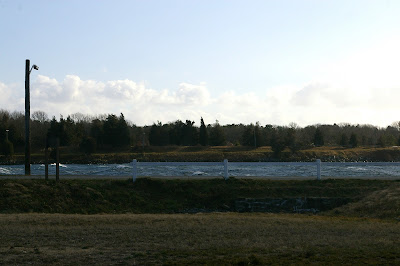
Friday, Jan.13th was wicked windy. There were gusts between 50-70 mph all day long, into the early evening and that's when the temps started to dip to single digits. We'd gone into Sandwich to do some errands and saw that the Canal was extremely choppy. When we got back to BBay we went over to the train bridge. I could barely keep my footing in the wind. I don't think I've ever seen surf like this in the Canal when it wasn't a nor'easter or hurricane.

These pictures don't do the waves justice at all. It was high tide and the wind was screaming.

Needless to say, we didn't see any marine traffic this day.


It's hard to see, but this was taken from my windshield, because the rollers were very impressive from this angle.
Locust trees against the late afternoon sky on the 14th. This is at my mom's.
Friday, Jan.13th was wicked windy. There were gusts between 50-70 mph all day long, into the early evening and that's when the temps started to dip to single digits. We'd gone into Sandwich to do some errands and saw that the Canal was extremely choppy. When we got back to BBay we went over to the train bridge. I could barely keep my footing in the wind. I don't think I've ever seen surf like this in the Canal when it wasn't a nor'easter or hurricane.

These pictures don't do the waves justice at all. It was high tide and the wind was screaming.

Needless to say, we didn't see any marine traffic this day.


It's hard to see, but this was taken from my windshield, because the rollers were very impressive from this angle.


Old building at the E. Sandwich Grange.

Flooded cranberry bog with a skimcoat of ice, on Old County Road. Bogs are flooded in extreme temperatures to protect the plants.

Along Rte. 6A, E. Sandwich

At the Sandwich Marina. These boats are in a vacant lot for the winter. I didn't notice the masts sticking up when I first drove past them, till I got to the other side of the marina.

Jan. 15th was the most frigid of the entire weekend. This cold steel brought to mind the scene in "A Christmas Story" when Schwartz double dog dares Flick to lick the flag pole.

This was my Project 365 picture for that day.

Sunset from the back door, Jan. 15.

Another gorgeous, cold day on the 16th as well.


Stoked to see this Dead sticker on a canoe at Shawme Pond. We are everywhere.

Shawme Pond starting to freeze, but not enough to skate on.

Don't these roots look like bones? Especially that 'arm' in the upper right corner with 2 bony fingers giving the peace sign.

Shawme Pond. That's a buoy in the ice.


My old stomping ground in Western Washington, is experiencing this, to which I say, "Better them than me!" I'll take freezing cold and clear any day over snow!

Subscribe to:
Posts (Atom)